Open the document in Word on the Mac. Click the “File” option on the top toolbar, and then click the “Save As” option. Type a new name for the file,. You can change the default settings in the Normal template, and the settings will be used in. On the Format menu, click Document, and then click the Layout tab. If you are using Word 2016 for Mac, go to /Users/username/Library/Group.
Microsoft Word is powerful text editing tool that makes your job effortless. With the aid of this program, you can include much stuff for instance text, hyperlink, clip art, OEL object, chart, image, video and more in your Word file.
But, some users experienced an odd issue with their Word document regarding images embedded in their file. Yes, pictures inserted to a Word file may not show up when the user tries to access the document.
A Word file fails to display its images due to a number of reasons.
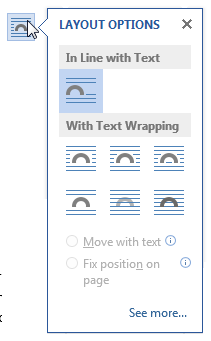
Case 1: Usually this issue arises even due to some settings that you made to your word application. Using “Wrapping style” option with your image instead of “In line with text” and other settings listed below can be a reason for the issue:
- Word document view is set to Draft view or Outline
- If Show drawings and text boxes on screenpreference is disabled.
- When Print drawings created in Wordchoice deactivated.
- If you have enabled, Use draft quality
Case 2: When you opt “In line with text” selection for your inserted images and still, your Word document is not showing pictures then it seems Picture Placeholders option is enabled in your Word application.
Case 3: In some circumstances, your images don't show up in Word document, if there exist any glitches in your Windows video driver.
So, try below-explained troubleshooting methods and try to solve your Word document not showing pictures problem. Family budget planner excel spreadsheet spread template for mac.
Method 1: Use 'In line with text' option
- Click on the inserted image
- Switch to Formattab
- Go to Arrangegroup
- Select Text Wrapping
- Opt In line with text
Method 2: Change the View
If you are using Draft or Outline view, then select one of these views,
Print Layout/ Full-Screen Reading / Web Layout
Method 3: Enable Show drawings and text boxes on screen option
- Go to File and select Options
- Click on Advanced tab
- Switch to Show document content
- Enable Show drawings and text boxes onscreenoption
- Hit OK button
Method 4: Enable Print drawings created in Word option
- Hit File tab and go to Options
- Jump to Display
- In Printingoptions, enable Print drawings created in Wordoption
- Apply changes
Method 5: Disable Use draft quality
- Follow the fourth method and navigate to Print
- Uncheck Use draft qualityoption
- Opt OK
Method 6: Disable Picture Placeholders
- Track the third method and reach Show document content
- Uncheck Show Picture Placeholderspreference
- Hit OK option
Method 7: Video driver
- Go to Start and launch Command Prompt
- Type cpl
- Change your Windows video driver color quality settings and screen resolution.
- Try updating the video driver
If none of the above fixation helps you then you have to employ some potent troubleshooting technique to bring your Word file to back to the normal working state. So, try to repair your DOC file / DOCX file using Remo Word Repair utility. The tool is capable of solving any odd behavior of the Word document, regardless of the cause behind the corruption.
However, you should never forget a fact that if you don’t want to get into any problematic situations regarding your Word files then always maintain multiple copies of your important Word document in different locations.